(Page 3 of 7 )
We have time and again discussed that Visual Basic.NET is not a Visual Basic 6 Deluxe, but a totally different and an altogether new platform, which is compliant to .NET Framework. This does mean that there is no straightforward way to upgrade the existing Visual Basic 6 applications.
Though the Upgrade Wizard handles many of the tasks for us, we have to do some modifications to the code manually. The different programming styles, some ambiguities like late binding, some not supported functions make it impossible to automate the task completely. Upgrading manually will not be possible without knowing Visual Basic.NET and the .NET framework. In other words, there is no shortcut for upgrading your existing applications. You have to learn Visual Basic.NET
Upgrading Your First VB6 Application
Unless we are using Standard edition of Visual Basic .NET, upgrading Visual Basic 6 applications is an almost automatic process in Visual Basic .NET. When you open a Visual Basic 6 application in Visual Basic.NET, the Upgrade Wizard steps in to guide you through the upgrade process. It creates a new Visual Basic.NET application leaving the original project untouched. When the project is upgraded, most of the code is modified to support new syntax and Visual Basic 6 forms are converted to Windows Forms. But, in most of the cases some manual modification is required because certain language features do not have any equivalent in Visual Basic.NET and also the automatic upgrade might not take any advantage of the new features in Visual Basic .NET.
The Upgrade Wizard provides us with following options wherever available.
1) What type of project to create:
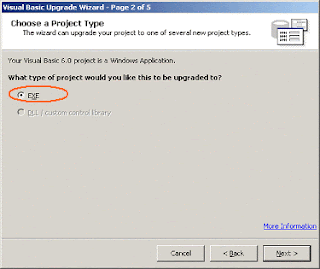
If the type of project chosen for upgrading is an ActiveX Exe or ActiveX Document Exe project, we can choose to upgrade it to either exe or dll project. The all the other projects this option is not available and the only other option available is already selected.
2) Generate default interfaces for all public classes
If the project chosen is not a Standard Exe project, then this option specifies how interfaces will be generated in the new project. By default, interfaces will only be generated for public classes that are implemented by other classes in the project. If all public classes option is selected, interfaces will be generated for all public classes even if they are not implemented
3) Location for the project:
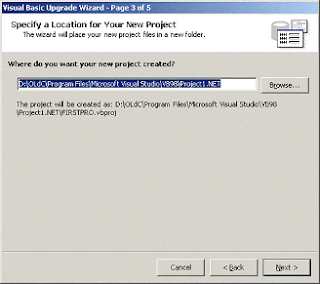
This option lets us choose the folder for our new project. By default the project will be placed in a child folder of the current project. Default name of the new project will be projectname.NET.
After the upgrade is complete, the Upgrade Wizard creates an Upgrade report for the project, itemizing the problems if any. It also adds comments to the converted code. They are displayed in the task list window as “To DO” task. Each task is associated with a help topic with a link.
Let us now put the Upgrade Wizard to some work
Create a Project in Visual Basic 6
Add 3 Command Buttons, A Text Box and a label to the form. Name the Command Buttons: Cmdend, cmdForm2, command2
Add Following Code
To the Click event of Cmdend, just add End
To the Click event of Command2, Ask some Text to be displayed in the text Box
In the Click event of the cmdForm2, just add Form2.Show
Give the Label1 some caption.
Add a second form
Have a label on it
In the form load event of this form, add Label1.Caption = Form1.Label1.Caption
Add a Command Button and in the click event just add Unload Me
Run and test the project in Visual Basic 6.
When you are sure that the project is running alright, save it and close Visual Basic 6. This is an important step. Unless the project is running well, the comments and report by the Upgrade Wizard might not be useful. Either the wizard may generate wrong code or might not know what to do.
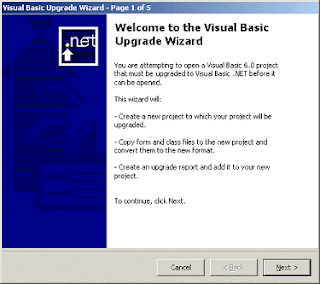
Open Visual Basic.NET and open the same project. The Upgrade Wizard starts automatically with a welcome screen.

Click on the next button to get the next screen that selects the type of project to be created

As ours is a Standard Exe project, only Exe option is available.

Now, let’s go to the next step and finalize the location of our project.. This done, the wizard just shows its progress while it processes the project. Now that the wizard has upgraded the project, let us examine the report created by it check if any manual changes are required.
Tidak ada komentar:
Posting Komentar